Have you ever needed to configure a Windows setting that just isn’t available in the Microsoft Intune Settings Catalog?
Microsoft Intune offers multiple ways to configure Windows devices, with the Settings Catalog being the preferred method for most scenarios. However, when you need to configure settings not yet available in the Settings Catalog, or require values beyond what Microsoft provides, custom policies using OMA-URI become essential. Based on my experience managing multiple Microsoft Intune environments, custom policies are a tool every IT admin should understand - even if you don’t need one today, the day will come.
When to use custom policies
Before creating a custom policy, always check if your setting is available in the Settings Catalog - it’s constantly updated and easier to manage. Custom policies are best suited for these scenarios:
- Unavailable settings: The setting doesn’t exist in the Settings Catalog, or is only available for certain Windows editions or versions.
- Custom values: You need a value or option different from what Microsoft Intune provides.
- Combined configurations: You need to combine settings in a single policy that wouldn’t otherwise be possible.
Tip
The Settings Catalog is expanding with every service update. A setting that required a custom policy six months ago may now be available natively. Before investing time in an OMA-URI configuration, do a quick search in the Settings Catalog - it could save you maintenance down the road.Understanding OMA-URI
Custom policies use OMA-URI (Open Mobile Alliance Uniform Resource Identifier) - a standard that defines how to access and configure device settings through the device management tree. If you have a background in Group Policy, think of OMA-URI as the MDM equivalent of navigating the Group Policy Editor tree - each path points to a specific setting, just in a different format.
Each OMA-URI is a unique path pointing to a specific setting, such as:
./User/Vendor/MSFT/Policy/Config/CloudContent/ConfigureWindowsSpotlight
The path structure follows a consistent pattern:
| Segment | Purpose |
|---|---|
./User or ./Device | Scope - whether the setting applies per-user or per-device |
Vendor/MSFT | Vendor identifier (always Microsoft for Windows) |
Policy/Config | Indicates this is a policy configuration |
CloudContent | The CSP (Configuration Service Provider) area |
ConfigureWindowsSpotlight | The specific setting name |
Important
OMA-URI paths are case-sensitive. A single typo - an uppercase letter where lowercase is expected, or a missing forward slash - will cause the policy to fail silently. Always copy the path directly from the Windows CSP documentation rather than typing it manually.Creating a custom policy
Each OMA-URI setting requires the following information:
| Property | Description |
|---|---|
| Name | A unique identifier to help you recognize the setting |
| Description | An overview of the setting and key details |
| OMA-URI | The case-sensitive path to the setting (from Windows MDM documentation ) |
| Data type | Base64 (file), Boolean, String, String (XML file), Date and time, Floating point, or Integer |
| Value | The data value matching your selected data type |
Step-by-step configuration
Follow these steps to create a custom policy in the Microsoft Intune admin center:
Sign in to the Microsoft Intune admin center and navigate to Devices > Windows > Configuration.
Select Create > New Policy, then choose Windows 10 and later as the platform.
Choose Templates > Custom and select Create.
Selecting the Custom template to create a new policy Image viewer
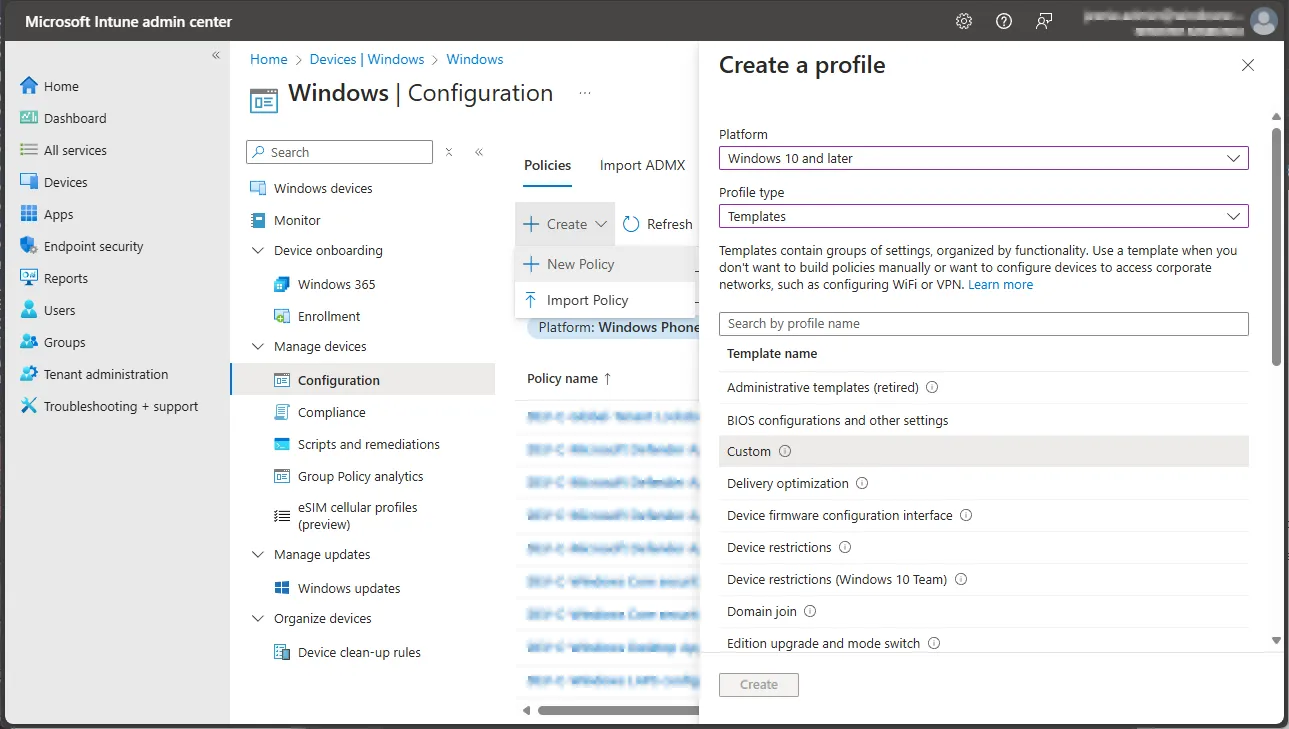
Selecting the Custom template to create a new policy Enter a descriptive Name and optional Description for the policy, then select Next.
Entering a descriptive name and description for the custom policy Image viewer
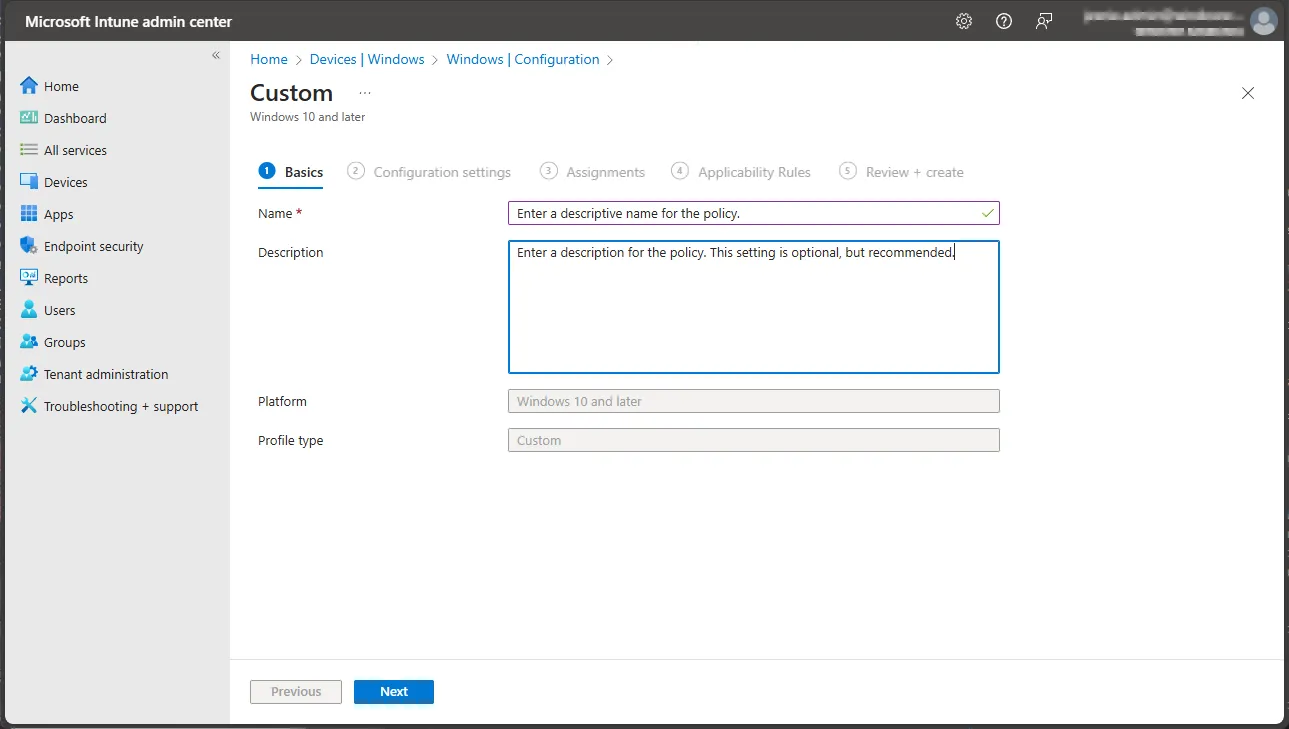
Entering a descriptive name and description for the custom policy Select Add to configure your OMA-URI settings:
- Enter the name, description, and data type
- Enter the OMA-URI path
- Enter the value for the setting
Adding an OMA-URI row with name, path, data type, and value Image viewer
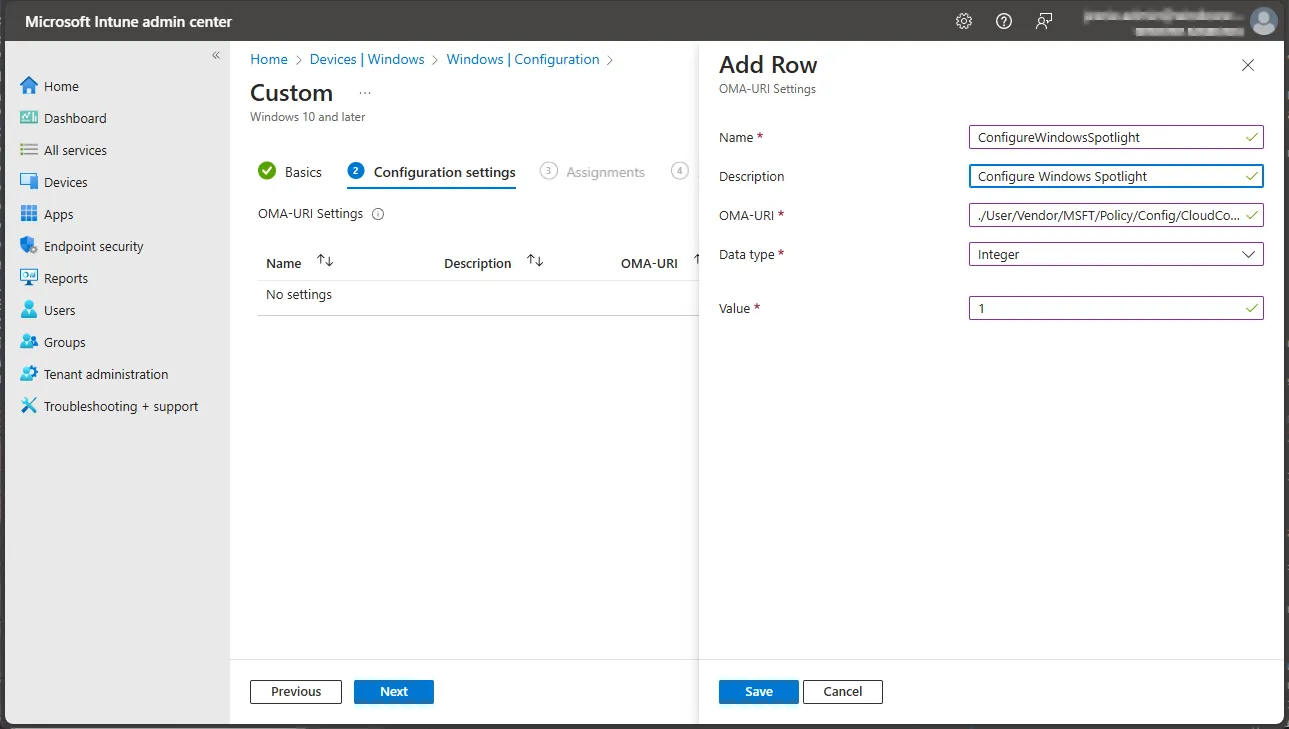
Adding an OMA-URI row with name, path, data type, and value Select Save. Repeat step 5 to add more settings as needed.
Select Next, assign the policy to appropriate groups, configure Applicability Rules if required, review your settings, and select Create.
Tip
When adding multiple OMA-URI rows to a single policy, group related settings together. For example, all Windows Spotlight settings in one policy, all browser-related settings in another. This makes troubleshooting and documentation much easier.After deployment
After deploying the policy, monitor its status in the Microsoft Intune admin center under Devices > Windows > Configuration by selecting your policy and reviewing the device and user status. If a setting isn’t applying as expected, check the Intune Management Extension log on the device (C:\ProgramData\Microsoft\IntuneManagementExtension\Logs) for detailed error information.
If you’re also using config refresh to re-apply configuration policies periodically, keep in mind that custom policies follow the same refresh behavior - a helpful safety net if users or applications change settings after initial deployment.
Real-world examples
The following examples demonstrate common scenarios where custom policies solve configuration challenges that the Settings Catalog cannot address.
Configuring Windows Spotlight
Windows Spotlight displays curated images and tips on the lock screen. Since this setting isn’t fully configurable through the Settings Catalog, you can use a custom policy to control it:
| Property | Value |
|---|---|
| OMA-URI | ./User/Vendor/MSFT/Policy/Config/CloudContent/ConfigureWindowsSpotlight |
| Data type | Integer |
| Value | 1 (enable) or 0 (disable) |
Note
This setting targets the user scope (./User/), meaning it applies to the signed-in user rather than the device. If you need device-level control, check the CloudContent CSP documentation for available device-scope alternatives.Setting a non-Edge default browser
The Settings Catalog only offers Microsoft Edge as the default browser option. To configure Chrome, Firefox, or another browser as the default, you need a custom policy with an XML-based associations file:
| Property | Value |
|---|---|
| OMA-URI | ./Device/Vendor/MSFT/Policy/Config/ApplicationDefaults/DefaultAssociationsConfiguration |
| Data type | String (XML file) |
| Value | A Base64-encoded XML file containing the file type and protocol associations |
To generate the XML file, use the following PowerShell command on a reference device where the desired default browser is already configured:
# Description: Exports the current default application associations to an XML file
# Elevation is required - DISM requires administrative privileges

dism /online /Export-DefaultAppAssociations:"C:\temp\DefaultAppAssociations.xml"
Example: Export default application associations from a reference device
Important
The XML content needs to be Base64-encoded before uploading it to the policy. You can encode the file using PowerShell with[Convert]::ToBase64String([IO.File]::ReadAllBytes("C:\temp\DefaultAppAssociations.xml")).These examples illustrate when custom policies fill gaps that the Settings Catalog cannot address. Your organization may have additional requirements that warrant custom configurations.
Best practices
Over time, I have picked up a few habits that make custom policies easier to manage across environments:
- Document everything: Include the source CSP documentation link in the policy description. Six months from now, you (or a colleague) will appreciate knowing exactly where the OMA-URI came from.
- Use a consistent naming convention: A pattern like
CFG - [Scope] - [Description](e.g.,CFG - Device - Disable Windows Spotlight) makes policies easy to find and filter in the admin center. - Test in a pilot group first: Custom policies can have unintended side effects. Always deploy to a small test group before broad rollout.
- Monitor for Settings Catalog additions: Settings that previously required custom policies may become available in the Settings Catalog. When they do, migrate to the native setting for better manageability and reporting.
- Avoid mixing scopes: Don’t combine user-scope and device-scope OMA-URIs in the same policy. It makes assignment and troubleshooting more complex than it needs to be.
Troubleshooting
Troubleshooting custom policies can be frustrating because they often fail silently - the policy deploys without errors in the admin center, but the setting never applies on the device. Here are the most common issues I have encountered:
- Typos in the OMA-URI path: Even a single wrong character causes a silent failure. Always copy paths directly from the CSP documentation.
- Wrong data type: Selecting “String” when the CSP expects “Integer” (or vice versa) will prevent the setting from applying.
- Scope mismatch: A user-targeted policy using
./Device/OMA-URIs (or the reverse) won’t work as expected. - Conflicting policies: If the same setting is configured in both the Settings Catalog and a custom policy, results can be unpredictable. Check for overlapping configurations.
- Encoding issues: For XML-based settings, make sure the content is properly Base64-encoded and doesn’t contain encoding artifacts.
Tip
The Intune Management Extension log on the device is your best friend when troubleshooting custom policies. Look for the OMA-URI path in the log to find related errors and status codes.Final thoughts
Custom policies are one of those features in Microsoft Intune that you might not need every day, but when you do, they’re invaluable. They bridge the gap between what Microsoft provides out of the box and what your organization actually needs - and that gap shows up more often than you might expect.
The key is treating them with the same discipline you would apply to any other configuration policy: document thoroughly, test carefully, and review periodically. The Settings Catalog continues to grow, and what requires a custom policy today may have a native option tomorrow. Keep checking.
Happy configuring.
–Jesper
Header image attribution: Image created with help from Adobe Firefly