
Code signing is a fundamental security practice that validates the authenticity and integrity of executable code. In enterprise environments managed by Microsoft Intune, code signing becomes essential for ensuring that only trusted, verified scripts run on your managed devices.
Whether you are deploying PowerShell scripts, remediation scripts, or Win32 applications, proper code signing practices protect your organization against unauthorized or malicious code execution.
What is code signing?
Code signing is the process of digitally signing executables, scripts, and other code using a cryptographic certificate. This digital signature serves two critical purposes: it verifies the identity of the code publisher and ensures the code has not been modified since it was signed.
In the context of Microsoft Intune, the Enforce script signature check setting determines whether the Microsoft Intune Management Extension (IME) validates the digital signature of a script before execution. When enabled, only scripts signed by a trusted publisher will run on target devices.
Code signing applies to various types of code in enterprise environments:
- PowerShell scripts (
.ps1,.psm1,.psd1) - Remediation scripts deployed via Microsoft Intune
- Win32 applications and installers (
.exe,.msi) - Scripts used in application deployment (install/uninstall scripts)
Note
The Enforce script signature check setting defaults to No when creating new script policies in Microsoft Intune. Organizations should consider enabling this setting to strengthen their security posture.Why code signing matters
Code signing is not just a nice-to-have security feature - it is a critical control for any organization serious about protecting their environment. Here is why every script and executable used in production should be signed.
Security benefits
- Code Integrity: Ensures code has not been modified since it was signed by verifying the cryptographic hash. Even a single character change invalidates the signature.
- Publisher Verification: Confirms the identity of the code author through certificate chain validation, establishing a clear chain of trust.
- Tamper Detection: Any modification to signed code invalidates the signature, preventing execution of altered or compromised code.
- Non-Repudiation: Signed code creates an audit trail linking the code to a specific publisher, supporting incident investigation and accountability.
Compliance and governance
- Regulatory Requirements: Many security frameworks (NIST, ISO 27001, CIS Controls) require or recommend code signing for administrative scripts and executables.
- Zero Trust Architecture: Code signing aligns with Zero Trust principles by verifying code authenticity before execution.
- Application Control Integration: Signed code works seamlessly with Application Control for Business (formerly Windows Defender Application Control, commonly known as WDAC) and AppLocker policies.
Operational benefits
- Tamper Protection for Privileged Scripts: Scripts deployed through Microsoft Intune often run in SYSTEM context with elevated privileges. Code signing ensures that if a cached script is modified locally, it will fail signature validation and not execute - protecting against local tampering attacks.
- Change Management: Signing processes integrate with change management workflows, ensuring proper review before deployment.
- Troubleshooting: Signature validation helps detect whether a script has been modified since it was signed. A
HashMismatchstatus immediately indicates tampering or unauthorized changes.
Image viewer

Understanding PowerShell execution policies
PowerShell execution policies control which scripts can run on a device and interact directly with script signing. Understanding how they work provides essential context before configuring Microsoft Intune signature enforcement.
| Execution Policy | Description |
|---|---|
| Restricted | No scripts are permitted to run (default on Windows clients). |
| AllSigned | Only scripts signed by a trusted publisher can run. |
| RemoteSigned | Downloaded scripts must be signed; locally created scripts can run unsigned. |
| Unrestricted | All scripts can run, but prompts for downloaded scripts. |
| Bypass | Nothing is blocked and there are no warnings or prompts. |
For a complete reference on execution policies, see about execution policies on Microsoft Learn.
Warning
Execution policies are not a security boundary. They are designed to prevent accidental script execution, not to stop determined users or attackers. Anyone with access to the command line can bypass execution policy by runningpowershell.exe -ExecutionPolicy Bypass -File script.ps1 or using other well-documented techniques. For true script execution control, use Application Control for Business (WDAC) or AppLocker in combination with code signing.Microsoft Intune signature enforcement vs. execution policy
Microsoft Intune signature enforcement works independently from the device execution policy. When you deploy scripts through Microsoft Intune, the Intune Management Extension (IME) handles script execution through its AgentExecutor component.
The Enforce script signature check setting controls which PowerShell execution policy parameter the IME uses when invoking scripts:
- When disabled (unchecked): The IME invokes PowerShell with
-ExecutionPolicy Bypass, allowing unsigned scripts to run regardless of the device’s configured execution policy. - When enabled (checked): The IME invokes PowerShell with
-ExecutionPolicy AllSigned, requiring scripts to have a valid signature from a trusted publisher.
The key point: the device’s configured execution policy does not apply to scripts deployed through Microsoft Intune. The IME explicitly sets the execution policy for each script invocation, overriding whatever is configured on the device.
- When signature check is disabled: The IME uses
-ExecutionPolicy Bypass. Even if the device has an AllSigned execution policy configured, unsigned scripts will still run. - When signature check is enabled: The IME uses
-ExecutionPolicy AllSigned. PowerShell validates the script’s digital signature before execution. The signing certificate (or its issuing CA) must be present in the device’s Trusted Publishers and Trusted Root Certification Authorities stores for the signature to be considered valid.
Important
When Enforce script signature check is enabled:
- The code signing certificate must be deployed to your devices before scripts will run. If the certificate is not trusted, script execution will fail even if the script is properly signed.
- This setting operates independently of the device’s PowerShell execution policy - Microsoft Intune will validate signatures even if the device has an Unrestricted policy.
- For maximum security, enable both Microsoft Intune signature enforcement and a restrictive device execution policy.
See Deploying Certificates to Devices Using Microsoft Intune for certificate deployment details.
Types of code signing certificates
Code signing certificates come in several varieties, each suited for different use cases. The right choice depends on factors like your existing infrastructure, budget, compliance requirements, and whether scripts are used internally or distributed externally. Understanding these options - from commercially issued certificates to internal PKI and self-signed alternatives - helps you select the approach that balances security, cost, and operational complexity for your organization.
Tip
New to code signing? If you are learning about code signing for the first time, consider starting with Self-Signed Certificates. They are free to create, require no infrastructure, and let you practice the complete signing workflow - from certificate creation to script signing and signature verification. The export and import steps shown there apply equally to commercial and internal PKI certificates. Once you are comfortable with the concepts, transition to a trusted certificate for production use.Commercial certificates (recommended for production)
Certificates issued by public Certificate Authorities (CAs) such as DigiCert, Sectigo, or GlobalSign chain to root CAs that are already included in the Windows Trusted Root Certification Authorities store through the Microsoft Trusted Root Program. This means the certificate chain validates without deploying root certificates.
However, for non-interactive script execution (such as scripts deployed via Microsoft Intune), the code signing certificate itself must still be deployed to the Trusted Publishers store on target devices. Without this, PowerShell cannot confirm the publisher is trusted without prompting the user - and non-interactive execution has no opportunity to respond to such prompts.
Benefits:
- Root CA is already trusted - no need to deploy root certificates.
- Simplified chain validation compared to internal PKI.
- Meets compliance requirements for most regulatory frameworks.
- Identity verification by the CA provides additional assurance.
Considerations:
- Annual cost for certificate renewal.
- Requires identity verification by the CA.
- Code signing certificate must still be deployed to the Trusted Publishers store on managed devices for non-interactive execution.
Tip
Commercial code signing certificates are available in two validation levels: Organization Validation (OV) and Extended Validation (EV). For signing scripts deployed through Microsoft Intune, OV certificates are typically sufficient - the scripts run silently through the IME, so EV SmartScreen reputation benefits do not apply. EV certificates require hardware security modules (HSM) for private key storage and are more expensive, making them better suited for publicly distributed software where immediate SmartScreen trust is valuable.Internal PKI certificates
Organizations with an internal Public Key Infrastructure (PKI) can issue code signing certificates from their enterprise CA. This approach is cost-effective for organizations that already have PKI infrastructure.
Benefits:
- No recurring certificate costs.
- Full control over certificate issuance and revocation.
- Ideal for internal scripts that do not leave the organization.
Considerations:
- Requires PKI infrastructure.
- Root CA certificate must be deployed to all devices.
Requesting a code signing certificate
- Open
certmgr.mscor search foruser certificatesin the Start menu and selectManage User Certificates. - Navigate to Personal > Certificates.
- Right-click and select All Tasks > Request New Certificate.
- Follow the Certificate Enrollment wizard.
- Select a Code Signing certificate template.
- Complete the enrollment process.
Requesting a certificate using PowerShell
If you prefer automation or need to script certificate enrollment, use the Get-Certificate cmdlet to request a code signing certificate from your enterprise CA:
# Request a code signing certificate from AD CS
# Requires appropriate permissions and a published Code Signing template
$template = "CodeSigning"  # Name of your code signing template
$cert = Get-Certificate -Template $template -CertStoreLocation Cert:\CurrentUser\My

Write-Output "Certificate enrolled with thumbprint: $($cert.Certificate.Thumbprint)"
Request Code Signing Certificate from AD CS
Note
These enrollment methods require the device to be domain-joined or hybrid-joined with network access to your enterprise CA. Cloud-native Microsoft Entra joined devices cannot enroll directly from AD CS. For cloud-native scenarios, consider exporting certificates from a domain-joined device or obtaining certificates from a commercial CA.Caution
AD CS Web Enrollment Security Warning: If you are considering web enrollment for certificate requests, be aware that Certificate Authority Web Enrollment and Certificate Enrollment Web Service are vulnerable to NTLM relay attacks (including PetitPotam) if not properly hardened. Before enabling these services, review KB5005413: Mitigating NTLM Relay Attacks on Active Directory Certificate Services (AD CS) and implement the recommended mitigations:
- Enable Extended Protection for Authentication (EPA) on all AD CS web services.
- Require SSL/HTTPS connections.
- Disable NTLM authentication where possible - configure IIS to use Negotiate:Kerberos.
Failure to harden these services can allow attackers to relay NTLM authentication and request certificates on behalf of domain controllers or other accounts.
Self-signed certificates (testing only)
Self-signed certificates can be created for testing and development purposes but should never be used in production environments.
Benefits:
- Free and quick to create.
- Useful for development and testing scenarios.
Considerations:
- Must be deployed to both Trusted Root and Trusted Publishers stores on each device.
- No established chain of trust - you are the root CA.
- Not suitable for production deployments.
Creating a self-signed certificate
For testing purposes, you can create a self-signed code signing certificate using the New-SelfSignedCertificate cmdlet:
# Create a self-signed code signing certificate
# No elevation required - certificate is created in current user store
$params = @{
    Subject           = 'CN=LAB-CodeSign-SelfSigned'
    FriendlyName      = 'Code Signing Test Certificate'
    Type              = 'CodeSigning'
    CertStoreLocation = 'Cert:\CurrentUser\My'
    HashAlgorithm     = 'SHA256'
    NotAfter          = (Get-Date).AddDays(90)  # Short validity for test certificates
    KeyUsage          = 'DigitalSignature'
    KeyAlgorithm      = 'RSA'
    KeyLength         = 2048
}
$cert = New-SelfSignedCertificate @params

# Display the certificate thumbprint
Write-Output "Certificate created with thumbprint: $($cert.Thumbprint)"
Create Self-Signed Code Signing Certificate
The certificate is stored in your Personal certificate store (Cert:\CurrentUser\My). To view it, open the Start menu and search for user certificates, then open Manage user certificates (or run certmgr.msc). Navigate to Personal > Certificates - you will see the certificate listed with the friendly name Code Signing Test Certificate.
Image viewer

To use this certificate for signing, you must first export the public key (without the private key) from your signing machine:
# Export the certificate (without private key)
# No elevation required - certificate is in current user store
$cert = Get-ChildItem Cert:\CurrentUser\My -CodeSigningCert |
    Where-Object { $_.Subject -like '*LAB-CodeSign-SelfSigned*' } | Select-Object -First 1

Export-Certificate -Cert $cert -FilePath "$env:USERPROFILE\Documents\LAB-CodeSign-SelfSigned.cer"
Export Self-Signed Certificate
Then, on each target device where signed scripts will run, import the exported certificate into both the Trusted Root Certification Authorities and Trusted Publishers stores:
# Import to Trusted Root and Trusted Publishers
# Elevation required - run as Administrator
$certFile = "$env:USERPROFILE\Documents\LAB-CodeSign-SelfSigned.cer"

Import-Certificate -FilePath $certFile -CertStoreLocation Cert:\LocalMachine\Root
Import-Certificate -FilePath $certFile -CertStoreLocation Cert:\LocalMachine\TrustedPublisher
Import Certificate to Trusted Stores
Optionally, set a friendly name on the imported certificates to make them easier to identify in the certificate manager:
# Set friendly name on imported certificates
# Elevation required - run as Administrator
$friendlyName = "Code Signing Test Certificate"
$subject = "CN=LAB-CodeSign-SelfSigned"

Get-ChildItem Cert:\LocalMachine\Root |
    Where-Object { $_.Subject -eq $subject } |
    ForEach-Object { $_.FriendlyName = $friendlyName }

Get-ChildItem Cert:\LocalMachine\TrustedPublisher |
    Where-Object { $_.Subject -eq $subject } |
    ForEach-Object { $_.FriendlyName = $friendlyName }
Set Friendly Name on Imported Certificates
Note
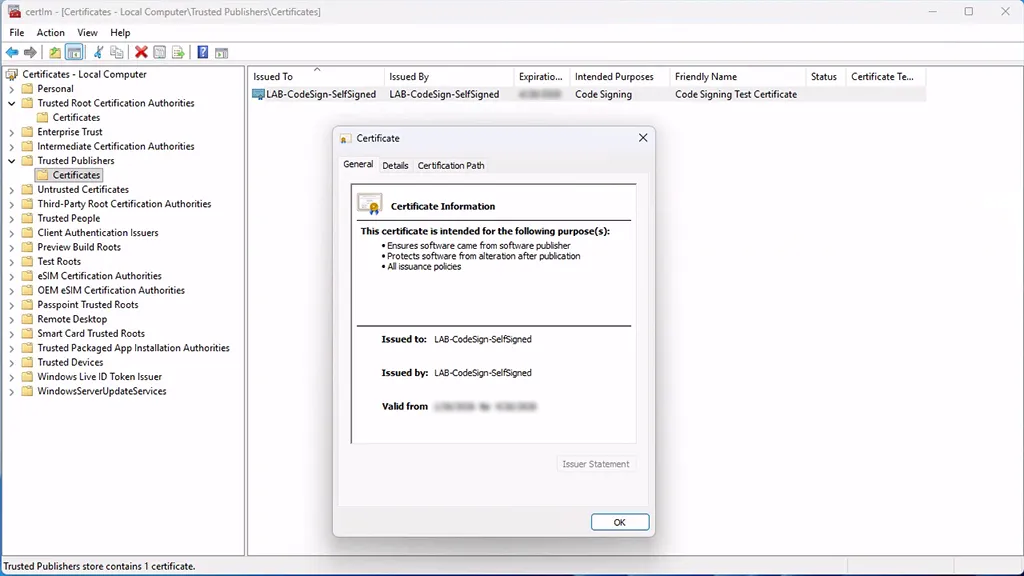
Self-signed certificates require import to both stores because the certificate is its own root CA. For a summary of certificate store requirements by certificate type, see Certificate Store Locations.To verify the certificate was imported successfully, open the Start menu and search for computer certificates, then open Manage computer certificates (or run certlm.msc). Navigate to Trusted Root Certification Authorities > Certificates and Trusted Publishers > Certificates to confirm the certificate appears in both locations.
Image viewer
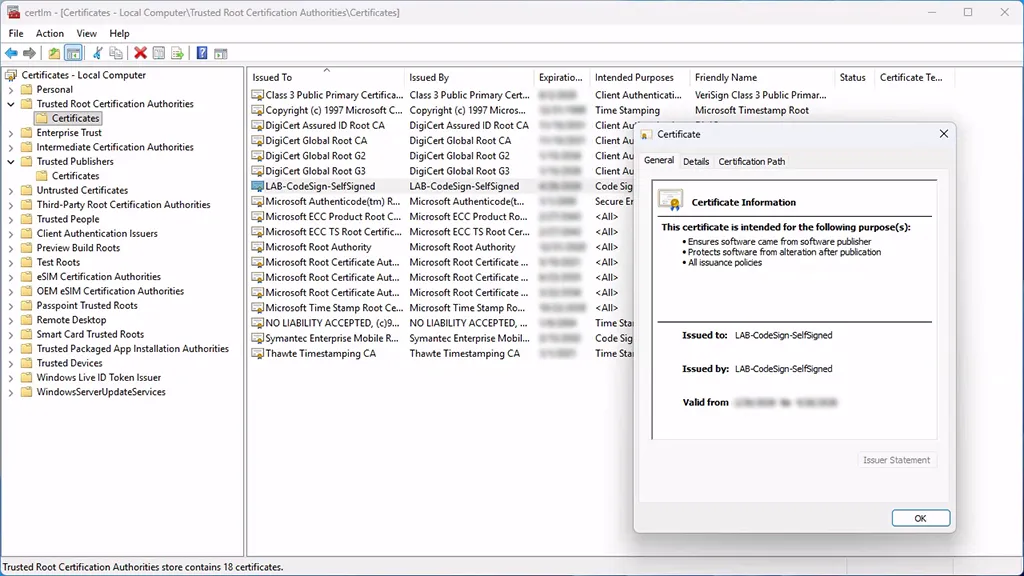
Image viewer
Removing the test certificates
When you are done testing, remove the self-signed certificate from all stores to clean up your environment:
# Remove the test certificate from all stores
# Elevation required - run as Administrator
$certName = 'LAB-CodeSign-SelfSigned'

# Remove from Personal store (current user)
Get-ChildItem Cert:\CurrentUser\My |
    Where-Object { $_.Subject -like "*$certName*" } |
    Remove-Item

# Remove from Trusted Root and Trusted Publishers (local machine)
Get-ChildItem Cert:\LocalMachine\Root |
    Where-Object { $_.Subject -like "*$certName*" } |
    Remove-Item
Get-ChildItem Cert:\LocalMachine\TrustedPublisher |
    Where-Object { $_.Subject -like "*$certName*" } |
    Remove-Item
Remove Self-Signed Certificate from All Stores
Alternatively, you can remove certificates manually. Open the Start menu and search for user certificates, then open Manage user certificates (or run certmgr.msc) for current user certificates. For local machine certificates, search for computer certificates, then open Manage computer certificates (or run certlm.msc). Navigate to each store and delete the certificate.
Warning
Self-signed certificates should only be used for testing. For production environments, always use certificates from a trusted Certificate Authority or your organization’s internal PKI.Signing PowerShell scripts
Once you have a code signing certificate, you can sign your PowerShell scripts using the Set-AuthenticodeSignature cmdlet. Always include a timestamp server to ensure your signed scripts remain valid even after the signing certificate expires:
# Get the code signing certificate
# No elevation required - certificate is in current user store
$certName = "LAB-CodeSign-SelfSigned"
$cert = Get-ChildItem Cert:\CurrentUser\My -CodeSigningCert |
    Where-Object { $_.Subject -like "*$certName*" } | Select-Object -First 1

# Sign a PowerShell script with timestamp
$scriptPath = ".\MyIntuneScript.ps1"
$timestampServer = "http://timestamp.digicert.com"

Set-AuthenticodeSignature -FilePath $scriptPath -Certificate $cert -TimestampServer $timestampServer

# Verify the signature
Get-AuthenticodeSignature -FilePath $scriptPath
Sign PowerShell Script
Note
Without a timestamp, scripts will fail signature validation after the signing certificate expires, even if they were signed while the certificate was valid. Always use a timestamp server when signing scripts for production use.Tip
TheSet-AuthenticodeSignature cmdlet works for any Authenticode-signed file type, not just PowerShell scripts. You can use the same approach to sign .exe, .msi, .dll, and .cab files - simply specify the file path and certificate as shown above.What a signed script looks like
After signing, a signature block is appended to the end of your script:
# Your script content here
Write-Output "Hello from a signed script!"

# SIG # Begin signature block
# MIIb6QYJKoZIhvcNAQcCoIIb2jCCG9YCAQExCzAJBgUrDgMCGgUAMGkGCisGAQQB
# gjcCAQSgWzBZMDQGCisGAQQBgjcCAR4wJgIDAQAABBAfzDtgWUsITrck0sYpfvNR
# ... (signature data) ...
# AgEAAgEAAgEAAgEAAgEAMCEwCQYFKw4DAhoFAAQU4Zgfq829xbUBygNK4PS1KBIn
# QQegghZSMIIDFDCCAfygAwIBAgIQb5H0HoPF/I9LNAQ6ZcdRUDANBgkqhkiG9w0B
# SIG # End signature block
Example of a Signed PowerShell Script
Deploying certificates to devices using Microsoft Intune
For devices to trust your signed scripts, the signing certificate (or its issuing CA) must be present in the appropriate certificate stores. Microsoft Intune provides several methods for certificate deployment.
Deploying a root CA certificate using a trusted certificate profile
The built-in Trusted certificate profile template supports deploying certificates to the Root and Intermediate certificate stores. Use this method for root CA certificates (required for internal PKI and self-signed certificates):
- Sign in to the Microsoft Intune admin center .
- Navigate to Devices > Windows > Configuration.
- Select Create > New policy.
- Select Windows 10 and later as the platform.
- Choose Templates > Trusted certificate.
- Select Create.
- Enter a name (e.g.,
Code Signing - Root CA). - Upload the root CA certificate file (.cer format).
- Select the Destination store: Computer certificate store - Root.
- Assign the profile to your device groups.
Important
The Trusted certificate profile template does not support the Trusted Publishers store as a destination. To deploy a code signing certificate to Trusted Publishers, you must use a custom OMA-URI profile as described in the next section.Deploying a code signing certificate to Trusted Publishers
Because the built-in Trusted certificate profile does not support the Trusted Publishers store, you need to create a custom configuration profile using an OMA-URI setting. This approach uses the RootCATrustedCertificates CSP to deploy the certificate.
Preparing the certificate
Export the certificate in Base-64 encoded X.509 (.CER) format. If you need to extract it from a signed file:
- Right-click on the signed file and choose Properties.
- Go to the Digital Signatures tab, select the signature, and click Details.
- Click View Certificate, then go to the Details tab and select Copy to File.
- Complete the Certificate Export Wizard, choosing Base-64 encoded X.509 (.CER) format.
Retrieve the certificate thumbprint: Open the exported certificate file, go to the Details tab, and copy the Thumbprint value (remove any spaces).
Get the Base-64 encoded value: Open the
.cerfile in a text editor and copy the content between-----BEGIN CERTIFICATE-----and-----END CERTIFICATE-----(excluding those lines). Remove any line breaks so the value is a single continuous string.
Creating the custom profile
- Sign in to the Microsoft Intune admin center .
- Navigate to Devices > Windows > Configuration.
- Select Create > New policy.
- Select Windows 10 and later as the platform.
- Choose Templates > Custom.
- Select Create.
- Enter a name (e.g.,
Code Signing - Trusted Publisher). - Add an OMA-URI setting with the following values:
- Name: A descriptive name for the setting.
- OMA-URI:
./Device/Vendor/MSFT/RootCATrustedCertificates/TrustedPublisher/<thumbprint>/EncodedCertificate(replace<thumbprint>with the actual certificate thumbprint, no spaces). - Data type: String.
- Value: The Base-64 encoded certificate content (single line, no line breaks).
- Assign the profile to your device groups.
For more details, see Adding a Certificate to Trusted Publishers using Microsoft Intune .
Note
If you need to deploy certificates to multiple stores - for example, a self-signed certificate that requires both Trusted Root and Trusted Publishers, or an internal PKI setup with a root CA certificate and a separate signing certificate - you must create separate profiles for each store: a Trusted certificate profile for the Root store and a Custom profile for Trusted Publishers. Name them clearly (e.g., “Code Signing - Root CA” and “Code Signing - Trusted Publisher”) to avoid confusion.Certificate store locations
A trusted publisher is a code signing identity that you have explicitly authorized to run code on your systems. By adding a code signing certificate to the Trusted Publishers store, you are declaring: “I have reviewed this publisher and I trust code signed by this certificate to execute without further confirmation.” This is essentially an allowlist of approved code signers for your environment.
When PowerShell encounters a signed script, it performs two distinct validations:
- Chain validation: Is the certificate chain valid? This checks whether the signing certificate chains to a trusted root CA in the Trusted Root Certification Authorities store.
- Publisher trust: Is this publisher authorized to execute code? This checks whether the signing certificate exists in the Trusted Publishers store.
Chain validation alone is not sufficient - a valid certificate chain only proves the certificate is legitimate, not that you trust that particular publisher to run code on your devices. Many certificates chain to trusted roots (any commercial CA customer, for example), but that does not mean you want their code running in your environment.
For interactive execution, if a script is signed by an unknown publisher (valid chain but not in Trusted Publishers), PowerShell prompts the user: “Do you want to run software from this untrusted publisher?” The user can choose to trust the publisher, and PowerShell remembers this choice by adding the certificate to their personal Trusted Publishers store.
However, scripts deployed through Microsoft Intune run non-interactively - typically in SYSTEM context with no user session to display prompts. If the signing certificate is not already in the Trusted Publishers store, there is no opportunity for user confirmation, and the script fails silently. This is why deploying the code signing certificate to Trusted Publishers is required for all certificate types - even commercial certificates whose root CA is already trusted through the Microsoft Trusted Root Program.
The following table summarizes which certificates should be deployed to each store:
| Certificate Type | Trusted Root | Trusted Publishers | Notes |
|---|---|---|---|
| Commercial | Not required | Required | Root CA is already trusted via Microsoft Trusted Root Program. |
| Internal PKI | Required (root CA) | Required (signing cert) | Deploy root CA separately from signing certificate. |
| Self-Signed | Required | Required | Same certificate goes in both stores. |
| Store | Purpose |
|---|---|
| Trusted Root Certification Authorities | Install root CA certificates here for chain validation. |
| Trusted Publishers | Install code signing certificates here to trust specific publishers. |
| Intermediate Certification Authorities | Install intermediate CA certificates if needed for chain building. |
Configuring script signature enforcement in Microsoft Intune
When creating a PowerShell script policy in Microsoft Intune, you configure the signature enforcement setting:
- Sign in to the Microsoft Intune admin center .
- Navigate to Devices > Scripts and remediations > Platform scripts.
- Select Add > Windows 10 and later.
- In the Basics tab, enter a name and description.
- In the Script settings tab, configure the following:
- Script location: Upload your signed PowerShell script.
- Run this script using the logged on credentials: Choose based on your requirements.
- Enforce script signature check: Set to Yes to require signed scripts.
- Run script in 64-bit PowerShell host: Configure as needed.
- Assign scope tags and device groups.
- Review and create the policy.
Important
If you set Enforce script signature check to Yes and deploy an unsigned script, the script will fail to execute on target devices. Always test your signing process before deploying to production.Warning
Timing issues during Windows Autopilot deployments: During device enrollment, scripts may execute before the code signing certificate has been deployed to the device. If Enforce script signature check is enabled and the certificate is not yet in the Trusted Publishers store, the script will fail - even though both the script and certificate are correctly configured.
This is a timing dependency, not a configuration error. To avoid this issue:
- Test thoroughly in your Windows Autopilot deployment scenarios to verify certificate deployment occurs before script execution.
- Consider a hybrid approach: Sign your scripts for integrity protection, but set Enforce script signature check to No during enrollment. This allows scripts to run regardless of certificate timing while still providing tamper detection for post-enrollment scenarios.
- Use assignment filters or groups to delay script execution until after the device has completed enrollment and received all certificate profiles.
Once devices are fully enrolled and certificates are deployed, you can enable signature enforcement for ongoing script deployments.
Testing signed scripts locally
Before deploying signed scripts through Microsoft Intune, you should test them locally to verify the signature is valid and trusted.
You do not need to change the device’s execution policy to test. Instead, use the -ExecutionPolicy parameter when invoking PowerShell:
powershell.exe -ExecutionPolicy "AllSigned" -File ".\MyScript.ps1" -Verbose
This tests signature validation without modifying device settings.
Note
The-ExecutionPolicy parameter must appear before the -File parameter. Anything after the script path is passed as arguments to the script itself, not to powershell.exe.Interpreting test results
If the script is unsigned, you will see:
File C:\Scripts\MyScript.ps1 cannot be loaded. The file C:\Scripts\MyScript.ps1 is not
digitally signed. You cannot run this script on the current system. For more information...
Unsigned Script error
If the script is signed but the certificate is not trusted:
File C:\Scripts\MyScript.ps1 cannot be loaded. A certificate chain processed, but terminated
in a root certificate which is not trusted by the trust provider...
Untrusted Certificate error
If the script was signed but has been modified since signing:
File C:\Scripts\MyScript.ps1 cannot be loaded. The file C:\Scripts\MyScript.ps1 is not
digitally signed. You cannot run this script on the current system. For more information...
Modified Script error
Note
When a signed script is modified, PowerShell typically reports it as “not digitally signed” rather than showing a hash mismatch error. This is because the modification invalidates the signature. To distinguish between a script that was never signed and one that was modified after signing, useGet-AuthenticodeSignature - a modified script will show a status of HashMismatch or UnknownError, while an unsigned script shows NotSigned.Tip
Renaming does not break signatures. The digital signature is based on a hash of the file’s content, not the filename. You can safely rename a signed script without invalidating its signature. However, any change to the file content - even adding a space or blank line - will break the signature and require re-signing.These errors confirm the AllSigned policy is being enforced correctly:
| Error | Cause | Resolution |
|---|---|---|
| Unsigned Script | The script was never signed. | Sign it using Set-AuthenticodeSignature. |
| Untrusted Certificate | The certificate chain is not trusted. Either the root CA certificate is missing from Trusted Root Certification Authorities, or the signing certificate is missing from Trusted Publishers. | Deploy both certificates as needed. |
| Hash Mismatch / Unknown Error | The script was modified after signing. | Review, and if applicable, re-sign the script with your code signing certificate. |
Enforcing restricted execution policy via Microsoft Intune
The default PowerShell execution policy on Windows clients is Restricted, which helps prevent accidental script execution. This is the recommended setting for most devices - it protects against unintentional script execution while not impacting scripts deployed through Microsoft Intune (which override the device policy).
If your organization wants to ensure devices maintain the Restricted policy and prevent users or software from changing it, you can enforce this via the Settings Catalog:
- Navigate to Devices > Configuration profiles > Create profile.
- Select Windows 10 and later and Settings catalog.
- Search for PowerShell and add Turn on Script Execution.
- Set to Disabled to enforce Restricted (no scripts can run).
- Assign to your device groups.
Tip
Changing the execution policy at the machine level requires administrator rights. If certain users need temporary flexibility for testing, consider deploying a Remediation script that resets the execution policy to Default (Restricted) on a daily schedule. This allows short-term testing while automatically restoring the default configuration.Overcoming unsigned code challenges
Now that you understand how to implement code signing, the next step is addressing a common reality: dealing with unsigned code in production environments. This problem often stems from a disconnect between development practices and security requirements.
Why code signing gets skipped
Code signing gets skipped for several common reasons. In my experience working with IT teams and developers, I have observed these patterns:
- Development Convenience: Signing every iteration during development adds friction.
- Lack of Awareness: Many IT professionals are not aware of code signing’s importance or implementation.
- Certificate Access: Obtaining and managing certificates requires planning that may not be prioritized.
- Time Pressure: Under deadline pressure, signing gets skipped with intentions to “do it later.”
Important
While these challenges are common within internal teams, they should never be accepted from external vendors. Any third-party software - including macros, scripts, installers, and binaries - must be properly signed. Unsigned code from vendors represents a significant security risk and should be rejected or escalated for review.The impact on security controls
When unsigned code reaches production, organizations face difficult choices:
- Disabling Security Controls: Administrators may disable signature enforcement or relax execution policies, creating security gaps.
- Application Control Conflicts: WDAC and AppLocker block unsigned scripts by default, leading to weakened policies or operational failures.
- Audit Failures: Security assessments often flag unsigned administrative scripts as findings requiring remediation.
Warning
If you are implementing application control policies (WDAC, AppLocker, or third-party solutions), unsigned scripts and executables will be blocked. Establish code signing practices before deploying application control to avoid operational disruption.Building a signing culture
To address these challenges:
- Make signing easy: Provide developers with access to certificates and simple signing tools.
- Integrate signing into CI/CD: Automate signing as part of build and deployment pipelines.
- Establish clear policies: Document when and how code must be signed before production deployment.
- Lead by example: IT and security teams should sign all scripts they deploy.
Auditing your existing scripts
Before enabling signature enforcement, audit your script inventory to identify what needs to be signed. The following PowerShell example scans a directory for PowerShell files and reports their signature status:
# Audit-ScriptSignatures.ps1
# Find all PowerShell scripts and check their signature status
# No elevation required
[string]$scriptDirectory = "C:\Scripts"  # Change to your script directory
Get-ChildItem -Path $scriptDirectory -Recurse -Include *.ps1, *.psm1, *.psd1 |
    ForEach-Object {
        $sig = Get-AuthenticodeSignature -FilePath $_.FullName
        [PSCustomObject]@{
            File          = $_.Name
            Status        = $sig.Status
            SignerName    = $sig.SignerCertificate.Subject
            CertValidFrom = $sig.SignerCertificate.NotBefore
            CertExpires   = $sig.SignerCertificate.NotAfter
            Timestamped   = if ($sig.SignerCertificate) { [bool]$sig.TimeStamperCertificate } else { 'N/A' }
        }
    } | Format-Table -AutoSize
Audit PowerShell Script Signatures
The output shows each script’s signature status at a glance:
File                      Status       SignerName                              CertValidFrom        CertExpires          Timestamped
----                      ------       ----------                              -------------        -----------          -----------
Install-Application.ps1   Valid        CN=Contoso Code Signing, O=Contoso Ltd  01/15/2025 00:00:00  01/15/2027 23:59:59  True
Get-DeviceInfo.ps1        NotSigned
Set-Configuration.ps1     HashMismatch CN=Contoso Code Signing, O=Contoso Ltd  01/15/2025 00:00:00  01/15/2027 23:59:59  True
Update-Registry.ps1       NotTrusted   CN=Unknown Publisher                    03/01/2025 00:00:00  03/01/2026 23:59:59  False
Sample Audit Output
Note
TheStatus property indicates both signature validity and tampering detection. A status of HashMismatch means the file was modified after signing - this could indicate tampering or simply that someone edited the script without re-signing it. In either case, the script should be reviewed and re-signed before deployment. See SignatureStatus Enum for all possible values.Tip
Why auditing matters for “unsigned” scripts. When you attempt to run a script with-ExecutionPolicy AllSigned, both truly unsigned scripts and modified signed scripts display the same error: “The file is not digitally signed.” The audit script above reveals the critical difference - a NotSigned status means the script was never signed, while HashMismatch or UnknownError means someone modified a previously signed script. This distinction is important: either status on a script that should be signed could indicate tampering and should be investigated before re-signing.This outputs the signature status for each file:
- Valid: Properly signed and trusted.
- NotSigned: No signature.
- NotTrusted: Signed, but certificate not trusted.
- HashMismatch: Script content modified after signing (signature block intact).
- UnknownError: Signature block corrupted, certificate chain issues, or encoding problems. Often occurs when a signed script is edited and the signature block becomes malformed.
Use this to prioritize which scripts need signing before enabling Enforce script signature check in Microsoft Intune. This approach also works for other Authenticode-signed file types such as .exe, .msi, .dll, and .cab files - simply adjust the -Include parameter to target the file types you want to audit.
Tip
This approach can be adapted for deployment as a Microsoft Intune Remediation detection script to audit signature status across your managed devices. UseExit 0 when all scripts are properly signed (compliant) and Exit 1 when unsigned scripts are detected (non-compliant) - the results will appear in Remediation reporting in the Intune admin center. For advanced logging, consider sending results to Log Analytics or a similar solution - see Windows kaleidoscope for inspiration on Log Analytics integration.Auditing scripts in Microsoft Intune
You can also audit your Microsoft Intune script policies to identify which ones have signature enforcement disabled. The following example uses Microsoft Graph PowerShell to query both platform scripts and remediation scripts:
# Audit-IntuneScriptEnforcement.ps1
# Query Microsoft Intune for script policies and their signature enforcement status
# No elevation required
Connect-MgGraph -Scopes "DeviceManagementConfiguration.Read.All", "DeviceManagementScripts.Read.All"

# Audit Platform Scripts (Device Management Scripts)
$platformScripts = Invoke-MgGraphRequest -Method GET -Uri "https://graph.microsoft.com/beta/deviceManagement/deviceManagementScripts"

Write-Output "`nPlatform Scripts:"
$platformScripts.value | ForEach-Object {
    [PSCustomObject]@{
        Name                  = $_.displayName
        EnforceSignatureCheck = $_.enforceSignatureCheck
        RunAsAccount          = $_.runAsAccount
    }
} | Format-Table -AutoSize

# Audit Remediation Scripts (Device Health Scripts / Proactive Remediations)
$remediationScripts = Invoke-MgGraphRequest -Method GET -Uri "https://graph.microsoft.com/beta/deviceManagement/deviceHealthScripts"

Write-Output "`nRemediation Scripts:"
$remediationScripts.value | ForEach-Object {
    [PSCustomObject]@{
        Name                  = $_.displayName
        EnforceSignatureCheck = $_.enforceSignatureCheck
        RunAsAccount          = $_.runAsAccount
    }
} | Format-Table -AutoSize

# Summary: Scripts without signature enforcement
$unsignedPlatform = ($platformScripts.value | Where-Object { $_.enforceSignatureCheck -eq $false }).Count
$unsignedRemediation = ($remediationScripts.value | Where-Object { $_.enforceSignatureCheck -eq $false }).Count

Write-Output "`nSummary:"
Write-Output "Platform scripts without signature enforcement: $unsignedPlatform"
Write-Output "Remediation scripts without signature enforcement: $unsignedRemediation"
Audit script for Microsoft Intune script signature enforcement
This script outputs a list of all platform and remediation scripts along with their signature enforcement status. For policies where Enforce script signature check is disabled, you should validate whether the underlying script is signed - if it is, you can enable enforcement; if not, sign it first.
Note
Graph returns the Enforce script signature check policy setting, not whether the script itself is signed. To verify signature status, check your source scripts locally usingGet-AuthenticodeSignature before uploading to Intune - see Auditing Your Existing Scripts for details.Note
The Microsoft Graph PowerShell SDK must be installed (Install-Module Microsoft.Graph -Scope CurrentUser). The account used to connect requires the DeviceManagementConfiguration.Read.All or DeviceManagementScripts.Read.All permission, typically available to Intune Administrators or Global Administrators.Tip
You can also run these queries directly in Graph Explorer . Sign in with your admin account and run:
- Platform scripts:
GET https://graph.microsoft.com/beta/deviceManagement/deviceManagementScripts - Remediation scripts:
GET https://graph.microsoft.com/beta/deviceManagement/deviceHealthScripts
Graph Explorer returns the same data as the PowerShell script above - you will see the full JSON response containing displayName, enforceSignatureCheck, runAsAccount, and all other properties for each script. The PowerShell example simply extracts and formats those specific properties into a readable table. Graph Explorer is a quick way to explore your Intune configuration without writing PowerShell code.
Common pitfalls and troubleshooting
Based on my experience helping organizations implement code signing, these are the most common issues you will encounter - and how to resolve them.
Certificate trust issues
Symptom: Scripts fail with signature validation errors even though they are signed.
Resolution: Verify that certificates are deployed as described in Deploying Certificates to Devices Using Microsoft Intune. Specifically:
- Signing certificate must be in the Trusted Publishers store.
- Root CA certificate must be in the Trusted Root Certification Authorities store (only required for internal PKI certificates - commercial CA roots are already trusted via the Microsoft Trusted Root Program).
- Intermediate certificates must be available for chain building.
Expired certificates
Symptom: Previously working scripts start failing after a certificate expires.
Resolution:
- Always use a timestamp server when signing scripts.
- Establish a certificate renewal process before expiration.
- Re-sign scripts with the new certificate and redeploy if no timestamp was used.
Script modifications
Symptom: Script fails after minor edits were made.
Resolution:
- Any modification to a signed script invalidates the signature.
- Re-sign the script after making changes.
- Implement a signing step in your script development workflow.
Verifying script signatures
Use the following command to check if a script is properly signed:
$sig = Get-AuthenticodeSignature -FilePath "C:\Scripts\MyScript.ps1"
$sig | Format-List *
Check the Status property:
- Valid: Script is properly signed and trusted.
- NotSigned: Script has no signature.
- HashMismatch: Script content was modified after signing.
- UnknownError: Signature block corrupted, certificate chain issues, or the script was modified in a way that broke the signature format. This is common when editing signed scripts changes the file encoding or line endings.
Microsoft Intune Management Extension (IME) log files
If scripts fail to execute, review the Microsoft Intune Management Extension logs:
C:\ProgramData\Microsoft\IntuneManagementExtension\Logs\AgentExecutor.log
This log file tracks PowerShell script executions and will contain details about signature validation failures.
The log also shows the exact command line used to invoke your scripts, confirming which execution policy the IME applied:
cmd line for running powershell is -NoProfile -executionPolicy bypass -file "C:\WINDOWS\IMECache\HealthScripts\...\detect.ps1"...Signature Enforcement Disabled
cmd line for running powershell is -NoProfile -executionPolicy allSigned -file "C:\WINDOWS\IMECache\HealthScripts\...\detect.ps1"...Signature Enforcement Enabled
This is useful for verifying whether Enforce script signature check is enabled (-executionPolicy allSigned) or disabled (-executionPolicy bypass) for a specific script execution.
Best practices
Certificate management
- Use a dedicated code signing certificate for Microsoft Intune scripts, separate from other signing purposes.
- Protect your private key with strong passwords and secure storage.
- Monitor certificate expiration and renew before expiry.
- Maintain a certificate inventory documenting which certificates are used for which purpose.
Script development workflow
- Sign scripts as the final step in your development process.
- Version control your scripts before signing.
- Test signed scripts in a pilot group before broad deployment.
- Document your signing process for team consistency.
- Leave shared scripts unsigned when publishing to GitHub or other repositories. Your signature identifies you as the publisher - users should review the code and sign with their own certificate before deploying to their environment.
Security considerations
- Never disable signature enforcement in production to work around signing issues.
- Audit script deployments regularly to ensure only authorized scripts are deployed.
- Use separate certificates for development/testing and production.
- Revoke compromised certificates immediately and re-sign affected scripts.
Final thoughts
Code signing is a foundational security practice that every organization should embrace, especially when deploying scripts and applications through Microsoft Intune. While implementing a signing workflow requires initial investment in certificates, processes, and training, the security benefits are substantial and lasting.
The key to success is treating code signing not as an afterthought but as an integral part of your development and deployment workflow. By establishing signing practices early - before you implement strict application control policies - you avoid the operational disruption and security compromises that come from deploying unsigned code.
The key takeaways:
- Sign everything in production, without exception.
- Plan ahead for application control - code signing is a prerequisite for WDAC and AppLocker.
- Reduce friction by providing teams with signing tools and automating through CI/CD pipelines.
Start with a pilot deployment to test your signing infrastructure, then gradually expand to your production environment. As you mature your practices, you will find that code signing becomes second nature - and your environment will be significantly more secure as a result.