
Still have legacy web applications that require Internet Explorer to function properly?
With Internet Explorer 11 now retired (as of June 15, 2022), organizations need a path forward for legacy web applications that were designed for Internet Explorer. Internet Explorer mode - often referred to as IE mode - in Microsoft Edge provides the answer, allowing you to run legacy sites within Microsoft Edge using the Trident MSHTML engine from Internet Explorer 11.
In my previous post, How to configure IE mode and disable Internet Explorer, I covered how to disable Internet Explorer 11 using policies and how to configure an Enterprise Mode Site List hosted on Azure Blob Storage. That approach works well, but it still requires you to host and maintain XML files yourself.
Microsoft has since introduced a fully cloud-native solution: Cloud Site List Management. This feature allows you to manage your site lists directly in the Microsoft 365 Admin Center, removing the need for on-premises infrastructure or manual file hosting. Based on my experience configuring this for customer environments, I will walk you through setting up Cloud Site List Management for Internet Explorer mode using Microsoft Intune.
What is Internet Explorer mode?
Internet Explorer mode on Microsoft Edge makes it easy to use all of the sites your organization needs in a single browser. It uses the integrated Chromium engine for modern sites and the Trident MSHTML engine from Internet Explorer 11 for legacy sites.
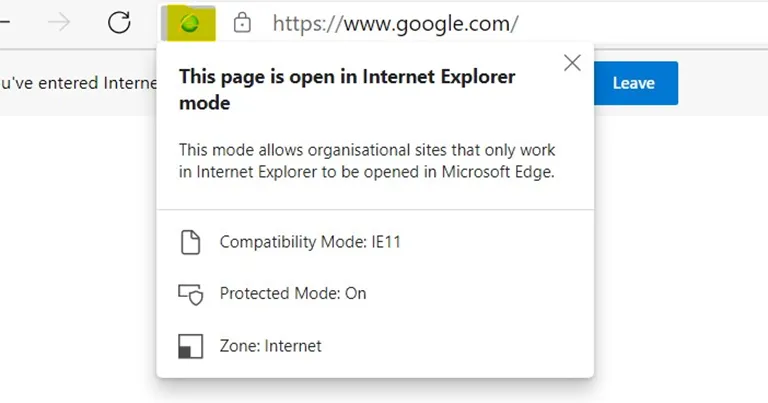
When a site loads in Internet Explorer mode, the Internet Explorer logo indicator displays on the left side of the navigation bar, indicating the site is running in compatibility mode.
Important
Internet Explorer mode supports document modes, enterprise modes, ActiveX controls (such as Java or Silverlight), Browser Helper Objects, and Internet Explorer settings that affect security zone settings and Protected Mode.For more information about Internet Explorer mode, see What is Internet Explorer (IE) mode? .
Cloud Site List Management overview
Cloud Site List Management lets you manage your site lists for Internet Explorer mode in the cloud through the Microsoft 365 Admin Center. This approach offers several advantages:
- Store your organization’s site list in a compliant cloud location instead of needing on-premises infrastructure
- Create, import, and export site lists through a web interface
- Audit changes to site list entries
- Publish multiple site lists and assign different groups of devices to use different lists
- Collect site feedback from users to identify gaps in your site list
Prerequisites
Before you begin, ensure you have the following:
- A Microsoft Entra tenant (formerly Azure AD)
- Microsoft Edge version 93 or later installed on devices
- The latest version of the Microsoft Edge policy files
- Microsoft Edge Administrator or Global Administrator role to access the Microsoft Edge site lists experience
- Users must be signed in to Microsoft Edge to consume the cloud-hosted site list
Step 1: Create a cloud site list
The first step is to create and publish your enterprise site list in the Microsoft 365 Admin Center.
- Sign in to the Microsoft 365 admin center with your admin credentials.
- Navigate to Settings > Org settings.
- Select Microsoft Edge site lists.
Note
If you do not see the Microsoft Edge site lists option, you may need to opt in to Targeted release. Navigate to Settings > Org settings > Organization profile > Release preferences and enable targeted release.Create a new site list
- On the Microsoft Edge site lists page, select Create a new list.
- Enter a Site list name and Description.
- Select Create, then Close panel.
Import an existing site list
If you already have an Enterprise Mode Site List XML file from the Enterprise Mode Site List Manager, you can import it directly:
- Select the site list you want to populate.
- Select Import list.
- Browse and select your XML file.
- Select Upload, then Add.
Add sites to your list
- Navigate into your site list.
- Select Add a site.
- Configure the following settings:
| Setting | Description |
|---|---|
| Site address | The URL of the site to open in Internet Explorer mode |
| Opens in | Select IE mode to open in Internet Explorer mode within Microsoft Edge |
| Compatibility mode | Choose the document mode (IE5, IE7, IE8, IE9, IE10, IE11, or Default Mode) |
| Allow redirects | Enable if server-side redirects should remain in IE mode |
| No merge | Enable for sites that need separate session handling |
| Comments | Add notes for version control and auditing |
- Select Save.
Publish your site list
Once you have added all required sites:
- Navigate back to the Microsoft Edge site lists page.
- Select the checkbox next to your site list.
- Select Publish site list.
- Enter a Version number (for example,
1.0). - Select Publish, then Close panel.
After publishing, copy the Site list ID (GUID) - you will need this for the Microsoft Intune configuration.
Step 2: Configure Microsoft Intune policies
With your site list published, you need to create configuration policies in Microsoft Intune to enable Internet Explorer mode and point devices to your cloud site list.
Create a Settings Catalog policy
- Sign in to the Microsoft Intune admin center .
- Navigate to Devices > Windows > Configuration.
- Select Create > New Policy.
- Select Windows 10 and later as the platform and Settings catalog as the profile type.
- Select Create.
Configure policy settings
- Enter a descriptive Name (for example,
Microsoft Edge - IE mode Cloud Site List) and optional Description. - Select Next to proceed to Configuration settings.
- Select Add settings.
- Search for and add the following settings from the Microsoft Edge category:
Configure Internet Explorer integration
- Setting: Configure Internet Explorer integration
- Value: Internet Explorer mode
This setting enables Internet Explorer mode in Microsoft Edge. Sites configured in your site list will open using the Internet Explorer rendering engine.
Configure the Enterprise Mode Cloud Site List
- Setting: Configure the Enterprise Mode Cloud Site List
- Value: Your Site list ID (GUID) from the Microsoft 365 Admin Center
This setting tells Microsoft Edge to use your cloud-hosted site list for Internet Explorer mode.
Important
When the Cloud Site List policy is configured, it overrides the traditional on-premises site list policy (InternetExplorerIntegrationSiteList).Configure sign-in requirements
Since users must be signed in to Microsoft Edge to consume the cloud-hosted site list, add these settings to ensure users are authenticated:
Setting: Force users to sign in to use the browser
Value: Enabled
Setting: Configure whether a user always has a default profile automatically signed in
Value: Enabled
Configure site list refresh interval
- Setting: Configure Internet Explorer integration site list refresh interval
- Value: 120 (minutes)
This setting controls how often Microsoft Edge checks for updates to the cloud site list. The minimum value is 30 minutes.
Complete the policy
- Select Next.
- Configure Scope tags if required.
- Assign the policy to appropriate device or user groups.
- Review your settings and select Create.
Note
Since Internet Explorer 11 was retired on June 15, 2022, consider deploying the Disable Internet Explorer 11 as a standalone browser policy to ensure users have a single browser experience. For detailed guidance, see my previous post How to configure IE mode and disable Internet Explorer.Step 3: Verify the configuration
After policies are deployed and devices have synced, verify the configuration on a target device.
Check applied policies
- Open Microsoft Edge.
- Navigate to
edge://policy. - Verify the following policies are applied:
InternetExplorerIntegrationLevel=IEModeInternetExplorerIntegrationCloudSiteList= Your Site list ID
Check the enterprise site list
- Navigate to
edge://compat/enterprise. - Verify the site list version and location display correctly.
- Confirm your site entries appear in the list.
- Use the Force update button to refresh the site list if needed.
Test Internet Explorer mode
- Navigate to a site from your enterprise site list.
- Verify the Internet Explorer logo appears in the address bar.
- Confirm the site renders correctly in the specified compatibility mode.
Managing site feedback
Cloud Site List Management includes a site feedback feature that helps identify gaps in your site list. With Microsoft Edge version 99 or later, you can enable feedback policies to:
- Collect sites that users add to their local Internet Explorer mode site lists
- Identify potentially misconfigured neutral sites
To enable site feedback, add these policies to your configuration:
- Enable cloud site list user reporting:
InternetExplorerIntegrationCloudUserSitesReporting - Enable cloud neutral sites reporting:
InternetExplorerIntegrationCloudNeutralSitesReporting
Site feedback appears in the Microsoft 365 Admin Center, where you can review and add sites to your published site list.
Final thoughts
The biggest shift Cloud Site List Management introduces is not the feature itself - it is eliminating the infrastructure dependency. With on-premises site lists, you needed a web server or storage account, a process for updating XML files, and a way to ensure devices could reach the hosting location. Cloud Site List Management removes all of that and replaces it with a web interface in the Microsoft 365 Admin Center.
The site feedback feature is worth paying attention to as well. Rather than waiting for help desk tickets to surface missing sites, you can proactively identify gaps in your site list and address them before they become user-impacting issues.
What are your experiences with configuring Internet Explorer mode for legacy applications? I would love to hear how you are managing the transition from Internet Explorer in your organization.
–Jesper