If you own a Windows PC, you might have encountered the term serial number, also known as product ID or service tag. A serial number is a unique alphanumeric code that identifies your device and its specifications. It can be useful for various purposes, such as checking the warranty status, requesting technical support, or registering your device with the manufacturer.
One of the scenarios where you might need to find the serial number of your Windows PC is when you want to use Windows Autopilot . This feature allows you to set up and configure new devices without the need for physical access or manual intervention. You can use a cloud-based service to create a profile for your device and assign it to your organization. To do this, you need to provide the serial number of your device, along with other information such as the manufacturer and model.
But how do you find the serial number of your Windows PC?
There are several ways to do this, depending on your preference and convenience. In this post, I will show you five different methods to locate the serial number of your Windows PC and compare their pros and cons.
| Method | Difficulty | Reliability | Best for |
|---|---|---|---|
| WMIC | Easy | High* | Quick lookups (Windows 10) |
| PowerShell | Easy | High | Scripting & Windows 11 |
| Settings app | Easy | Medium | Non-technical users |
| BIOS/UEFI | Medium | High | Troubleshooting scenarios |
| Hardware sticker | Easy | Variable | Physical verification |
Method 1: Using WMIC
WMIC stands for Windows Management Instrumentation Command-line, and it is a tool that allows you to perform various administrative tasks on your Windows PC. You can use WMIC to query and manage various aspects of your system, such as hardware, software, processes, services, and more. One of the things you can do with WMIC is to find the serial number of your Windows PC.
Caution
Deprecation notice: WMIC has been deprecated in Windows 11 since version 21H2. While it still works, Microsoft recommends transitioning to PowerShell for long-term compatibility. WMIC may be removed in future Windows updates.To use WMIC, you need to open the Command Prompt as an administrator. To do this, press the Windows key and type cmd. Then, right-click on the Command Prompt app and select Run as administrator. Alternatively, you can press the Windows key + X and select Command Prompt (Admin) from the menu.
Once you have opened the Command Prompt as an administrator, type the following command and press Enter:
wmic.exe bios get serialnumberThis command will display the serial number of your Windows PC on the screen. You can copy and paste it to a text file or a note app for later use.
However, this is not the only thing you can do with WMIC. You can also use it to find other information about your device, such as the manufacturer, model, version, and more. For example, you can type the following command and press Enter:
wmic.exe computersystem get manufacturer,modelThis command will display the manufacturer and model of your Windows PC on the screen. You can also combine multiple queries in one command, by using a comma to separate them. For example, you can type the following command and press Enter:
wmic.exe bios get serialnumber,version /format:listThis command will display the serial number and version of your BIOS on the screen, in a list format. You can also use the /format option to change the output format to other types, such as table, csv, or html. For a full list of WMIC commands and options, you can type wmic /? and press Enter.
The advantage of using WMIC is that it is fast and easy to use. You do not need to install any additional software or navigate through any menus. You just need to type one simple command and get the result instantly. However, there are some drawbacks of using WMIC as well. One of them is that it might not work on some devices, especially older ones or custom-built ones. Some manufacturers might not store the serial number in the BIOS, which is where WMIC looks for it. In that case, you might get a blank or invalid result. Another drawback is that WMIC has been deprecated in Windows 11 since version 21H2. While it still functions, Microsoft recommends using PowerShell instead for future compatibility.
Therefore, WMIC is a quick and reliable method for finding the serial number on Windows 10 devices. However, if you are using Windows 11 or planning for the future, consider using PowerShell as your primary method.
Method 2: Using PowerShell
PowerShell is another tool that allows you to perform various administrative tasks on your Windows PC. It is similar to WMIC, but more powerful and versatile. You can use PowerShell to access and manipulate various aspects of your system, such as hardware, software, registry, files, and more. You can also use PowerShell to find the serial number of your Windows PC.
To use PowerShell, you need to open it as an administrator. To do this, press the Windows key and type powershell. Then, right-click on the Windows PowerShell app and select Run as administrator. Alternatively, you can press the Windows key + X and select Windows PowerShell (Admin) from the menu.
Once you have opened PowerShell as an administrator, type the following command and press Enter:
Get-CimInstance -ClassName "Win32_BIOS" | Select-Object "SerialNumber"This command will display the serial number of your Windows PC on the screen. You can copy and paste it to a text file or a note app for later use.
However, this is not the only thing you can do with PowerShell. You can also use it to find other information about your device, such as the manufacturer, model, version, and more. For example, you can type the following command and press Enter:
Get-CimInstance -ClassName "Win32_ComputerSystem" | Select-Object "Manufacturer","Model"This command will display the manufacturer and model of your Windows PC on the screen. You can also combine multiple queries in one command, by using a comma to separate them. For example, you can type the following command and press Enter:
Get-CimInstance -ClassName "Win32_BIOS" | Select-Object "SerialNumber","Version"This command will display the serial number and version of your BIOS on the screen. You can also use the Format-Table or Format-List cmdlets to change the output format to a table or a list, respectively. For example, you can type the following command and press Enter:
Get-CimInstance -ClassName "Win32_BIOS" | Format-Table "Manufacturer","SerialNumber","Version"This command will display the serial number and version of your BIOS on the screen, in a table format. You can also use the Export-Csv or ConvertTo-Html cmdlets to export the output to a csv or html file, respectively. For example, you can type the following command and press Enter:
Get-CimInstance -ClassName "Win32_BIOS" | Export-Csv -Path ".\bios.csv" -NoClobber -Encoding "UTF8" -Delimiter ";" -NoTypeInformationThis command will export the serial number and version of your BIOS to a csv file named bios.csv in your current directory. You can also use the -Path parameter to specify a different location for the file. For a full list of PowerShell commands and parameters, you can type Get-Help and press Enter.
The advantage of using PowerShell is that it is more reliable and consistent than WMIC. It can work on most devices, regardless of the manufacturer or model. It can also work on Windows 11, as PowerShell is not going to be removed in the future versions of the operating system. However, there are some drawbacks of using PowerShell as well. One of them is that it is more complex and intimidating than WMIC. You need to type a longer and more complicated command, which might be prone to errors or typos.
As you might have noticed, we are looking for information from multiple Classes, so for a complete output of the requered information, you have to combine the queries.
# Get Manufacturer, Model and Serial Number and save to CSV
[string]$Manufacturer = (Get-CimInstance -ClassName "Win32_ComputerSystem").Manufacturer
[string]$Model = (Get-CimInstance -ClassName "Win32_ComputerSystem").Model
[string]$SerialNumber = (Get-CimInstance -ClassName "Win32_BIOS").SerialNumber
$hwInfo = [PSCustomObject]@{"Manufacturer"=$Manufacturer;"Model"=$Model;"SerialNumber"=$SerialNumber}
$hwInfo | Export-Csv -Path ".\bios.csv" -Encoding "UTF8" -Delimiter ";" -NoTypeInformation
This will export the Manufacturer, Model and serial number from your BIOS to a CSV file named .\bios.csv in your current directory, using ; as delimiter in the file.
Therefore, PowerShell is the recommended method for finding the serial number of your Windows PC, especially on Windows 11 or when you need to script the process for multiple devices. The syntax is slightly longer than WMIC, but the reliability and future-proofing make it worthwhile.
Method 3: Using the Windows Settings app
The Windows Settings app is the main interface for managing and customizing your Windows PC.
You can use it to change various settings and preferences, such as Display, Network, Privacy, Windows Update, and more. You can also use it to find the Serial number of your Windows PC.
To use the Windows Setting app, you need to open it from the Start menu. To do this, press the Windows key and type Settings. Alternatively, you can press the Windows key + I to open the Windows Setting app directly.
Once you have opened the Windows Setting app, click on the System category on the left pane. Then, scroll down and click on the About option on the right pane. This will display various information about your Windows PC, such as the device name, processor, memory, edition, version, and more. You will also see the serial number of your Windows PC under the Windows specifications section. You can copy and paste it to a text file or a note app for later use.

The advantage of using the Windows Setting app is that it is user-friendly and intuitive. You do not need to type any commands or open any tools. You just need to click on a few options and get the result easily.
However, there are some drawbacks of using the Windows Setting app as well.
One of them is that it might not show the serial number on some devices, especially older ones or custom-built ones. Some manufacturers might not store the serial number in the system information, which is where the Windows Setting app looks for it. In that case, you might not see the serial number at all.
Another drawback is that it is more time-consuming and cumbersome than WMIC or PowerShell. You need to open the Windows Setting app, navigate through several menus, and scroll down to find the serial number. This might be inconvenient or annoying for some users.
Therefore, the Windows Settings app is a good option for users who prefer a graphical interface and do not need to script or automate the process. However, be aware that not all devices display the serial number in this location.
Method 4: Using the BIOS/UEFI firmware
The firmware is the software that controls the basic functions and operations of your Windows PC. It is also known as the BIOS or UEFI, depending on the type of your device. You can use the firmware to configure various settings and options, such as boot order, security, overclocking, and more. You can also use it to find the serial number of your Windows PC.
To use the firmware, you need to access it during the startup of your Windows PC. To do this, you need to press a specific key or combination of keys when you see the manufacturer’s logo or the first screen on your device. The key or combination of keys varies depending on the manufacturer and model of your device, but some of the common ones are F1, F2, F10, F12, Del, or Esc.
Once you have accessed the firmware, you need to look for the serial number of your PC. The location and name of the serial number varies depending on the firmware and the manufacturer of your device, but some of the common places are under the Main, System, or Information tabs or menus. You might also see the serial number as the Product ID or the Service Tag.
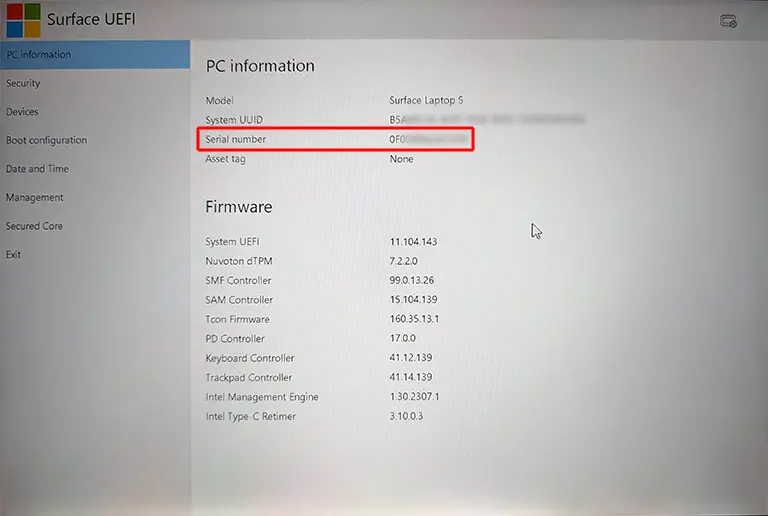
The advantage of using the firmware is that it is independent and universal. It does not depend on the operating system or the software installed on your PC. It can work on any device, regardless of the manufacturer or model.
However, there are some drawbacks of using the firmware as well.
One of them is that it is risky and complicated. You need to restart your Windows PC, press the correct key or combination of keys, and navigate through the firmware interface. If you make any mistake or change any setting, you might damage or corrupt your device.
Another drawback is that it is inconvenient and time-consuming. You need to shut down and boot up your Windows PC, and look for the serial number among various options and menus. This might be frustrating or tedious for some users.
Therefore, the BIOS/UEFI firmware is useful when you cannot boot into Windows or need to verify the serial number at the hardware level. However, use this method with caution and avoid changing any settings unless you know what you are doing.
Method 5: Using the hardware sticker
The hardware sticker is a physical label that is attached to your Windows PC. It usually contains various information about your device, such as the manufacturer, model, serial number, and more. You can use the hardware sticker to find the serial number of your Windows PC.
To use the hardware sticker, you need to locate it on your Windows PC. The location of the hardware sticker varies depending on the type and design of your device, but some of the common places are on the back, bottom, or side of your device. You might also find the hardware sticker inside the battery compartment, if your device has a removable battery. You can also check the user manual or the manufacturer’s website for the exact location of the hardware sticker for your device.
Once you have located the hardware sticker, you need to look for the serial number of your Windows PC. The name and format of the serial number varies depending on the manufacturer and model of your device, but some of the common names are Serial Number, Product ID, or Service Tag. You might also see a barcode or a QR code next to the serial number. You can write down or take a picture of the serial number for later use.
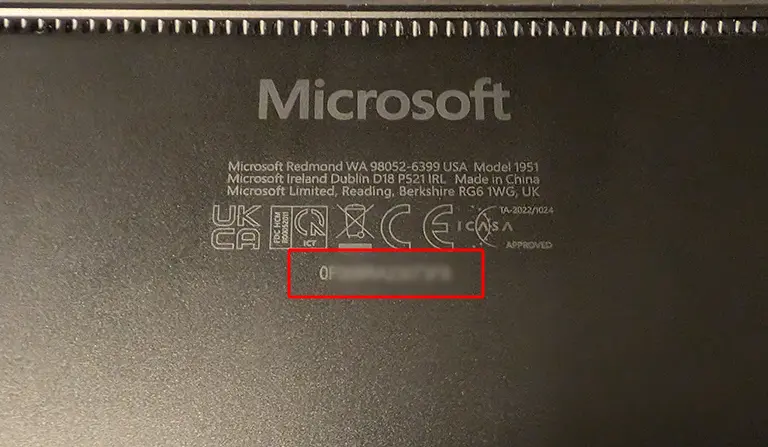
The advantage of using the hardware sticker is that it is simple and straightforward. You don’t need to use any commands, tools, or menus. You just need to look at the label and find the serial number.
However, there are some drawbacks of using the hardware sticker as well.
One of them is that it might be missing or damaged. The hardware sticker might be removed, worn out, or faded over time, making it unreadable or unrecognizable.
Therefore, the hardware sticker is a good fallback option when software methods are not available. However, physical labels can degrade over time, so do not rely on this as your only method for critical devices.
Summary
In this post, I have shown you five different ways to find the serial number of your Windows PC. Each method has its own advantages and disadvantages:
| Method | Pros | Cons |
|---|---|---|
| WMIC | Fast, simple one-liner | Deprecated in Windows 11 |
| PowerShell | Future-proof, scriptable | Slightly longer syntax |
| Settings app | User-friendly, no commands | May not show on all devices |
| BIOS/UEFI | Works without Windows | Requires restart, risky |
| Hardware sticker | No software needed | May be missing or damaged |
My recommendation: Use PowerShell as your primary method - it is reliable, works on Windows 10 and 11, and can be easily scripted for multiple devices. Use WMIC for quick lookups on Windows 10 if you prefer the simpler syntax.
Frequently asked questions
For Windows Autopilot registration, you need the device’s hardware hash, not just the serial number. While the serial number is part of the hardware hash, you should use the official script to collect the complete information:
Install-Script -Name Get-WindowsAutopilotInfo
Get-WindowsAutopilotInfo -OutputFile "$env:USERPROFILE\Desktop\autopilot.csv"
This script collects the serial number, manufacturer, model, and hardware hash in the format required for Autopilot enrollment.
This typically happens with custom-built PCs or devices where the manufacturer did not program the serial number into the BIOS. In these cases:
- Check the hardware sticker on the device
- Look for a serial number on the motherboard itself
- For custom builds, you may not have a traditional serial number
For asset tracking purposes, you can use the motherboard serial number instead:
Get-CimInstance -ClassName Win32_BaseBoard | Select-Object SerialNumberYes, you can use PowerShell remoting to query remote computers:
Get-CimInstance -ClassName Win32_BIOS -ComputerName "RemotePC" | Select-Object SerialNumberThis requires PowerShell remoting to be enabled on the remote computer and appropriate permissions. For multiple computers, you can use:
$computers = @("PC1", "PC2", "PC3")
Get-CimInstance -ClassName Win32_BIOS -ComputerName $computers | Select-Object PSComputerName, SerialNumberFor devices enrolled in Microsoft Intune, you can find serial numbers directly in the Intune admin center:
- Go to Devices > All devices
- Select a device to view its properties
- The serial number is displayed in the device details
You can also export a list of all devices with their serial numbers using the Export feature or Microsoft Graph API.
–Jesper