Have you ever wanted a unified terminal experience that combines the power of Git with the modern features of Windows Terminal?
If you work with version control, scripting, or development on Windows, you have probably encountered both Git Bash and Windows Terminal. While each is powerful on its own, combining them creates a seamless workflow that enhances productivity and brings the best of both worlds together.
In this post, I will explain what Git is, why you should add Git Bash to Windows Terminal, and provide a step-by-step guide to configure it manually - giving you full control over your setup.
What is Git?
Git is a free and open-source distributed version control system designed to handle everything from small to very large projects with speed and efficiency. Created by Linus Torvalds in 2005 for Linux kernel development, Git has become the industry standard for source code management.
Git allows you to track changes in your code and files, collaborate with other developers, and maintain a complete history of your project. It integrates seamlessly with platforms like GitHub , Azure DevOps , and GitLab , making it an essential tool for modern software development.
Git is not just for developers. IT professionals, system administrators, and anyone who works with configuration files, scripts, or documentation can benefit from version control.
Git works exceptionally well with editors like Visual Studio Code , providing visual diff tools, integrated terminals, and extensions that enhance your Git workflow.
What is Git Bash?
Git Bash is a command-line interface that comes bundled with Git for Windows . It provides a Bash emulation environment, offering a Unix-style command-line experience on Windows. This is particularly valuable for developers and IT professionals who are accustomed to Unix or Linux environments, or who work across multiple platforms.
Git Bash includes:
- Bash shell: A powerful command-line interpreter with scripting capabilities
- Git commands: Full access to Git version control functionality
- Unix utilities: Common tools like
grep,sed,awk,ssh, and more - MINGW64: A minimalist GNU environment for Windows
This combination makes Git Bash an invaluable tool for those who prefer the flexibility and efficiency of command-line operations over graphical user interfaces.
My personal workflow: Visual Studio Code
While this guide focuses on configuring Git Bash in Windows Terminal, I should mention that I rarely use Git Bash directly. All my day-to-day Git interactions happen through Visual Studio Code .
Visual Studio Code provides an excellent integrated Git experience that covers virtually everything I need:
- Source Control panel: Visual representation of changes, staging, and commits
- Integrated terminal: When I need command-line access, it is right there in the editor
- Git Graph and GitLens extensions: Enhanced visualization of repository history and blame annotations
- Diff viewer: Side-by-side comparison of file changes
- Branch management: Easy switching, creating, and merging branches
For most workflows, the Visual Studio Code Git integration is more than sufficient. I can stage changes, write commit messages, push to remote repositories, and handle merge conflicts without ever opening a separate terminal window.
So why bother configuring Git Bash in Windows Terminal? There are still scenarios where having direct terminal access to Git Bash is valuable - complex rebasing operations, troubleshooting Git issues, running shell scripts, or simply having a fallback when something goes wrong with the GUI. Having Git Bash properly configured in Windows Terminal ensures I am prepared for those edge cases while keeping my primary workflow streamlined in Visual Studio Code.
Adding Git Bash to Windows Terminal
Windows Terminal is Microsoft’s modern, feature-rich terminal application that supports multiple shells, tabs, split panes, and extensive customization. Integrating Git Bash into Windows Terminal offers several compelling advantages:
Unified terminal experience: Windows Terminal allows you to consolidate multiple command-line tools into a single interface. By adding Git Bash, you can switch seamlessly between different shells like PowerShell, Command Prompt, and Git Bash without leaving the terminal. This eliminates the need to have multiple terminal windows open and keeps your workflow organized.
Enhanced customization and efficiency. Windows Terminal supports extensive customization, from color schemes and fonts to key bindings and background images. With Git Bash included, you get the best of both worlds: the power of Unix commands and the modern features of Windows Terminal. You can create a personalized environment that matches your preferences and enhances productivity.
Advanced features for your workflow: Integrating Git Bash into Windows Terminal means you can leverage advanced features such as:
- Tabs and split panes: Work on multiple tasks simultaneously
- GPU-accelerated text rendering: Smooth, fast terminal experience
- Rich text and emoji support: Modern formatting capabilities
- Custom profiles: Different configurations for different tasks
- Quake mode: Quick access terminal dropdown
Why I skip Git Bash Start Menu shortcuts
While Git Bash is an incredibly useful tool, I prefer not to install it into the Windows Start Menu for several reasons:
Minimalist setup: Avoiding Start Menu clutter keeps my interface clean and streamlined. With dozens of applications installed, having another entry in the Start Menu adds unnecessary noise. I prefer launching Git Bash from Windows Terminal, which I already use as my primary terminal interface.
Alternative access methods: I prefer accessing Git Bash through Windows Terminal, where I can leverage tabs, split panes, and my customized configuration. The Start Menu shortcut becomes redundant when you have Git Bash integrated into your terminal workflow.
Consistency across systems: Working across multiple systems, including Unix, Linux, and Windows machines, keeping Git Bash out of the Start Menu helps maintain a consistent workflow. My muscle memory stays the same: open the terminal, switch to the Git Bash profile, and start working.
Why I skip automatic Windows Terminal integration
When deploying Git for Windows, you have the option to automatically add Git Bash to Windows Terminal during installation. However, I choose not to use this option, especially in enterprise environments. Here is why:
System context installation challenges: When deploying Git using tools like Microsoft Intune and installing in the system context, the automatic Windows Terminal integration becomes problematic. The installer runs under the SYSTEM account, which does not have access to user-specific settings like the Windows Terminal configuration file located in the user’s AppData folder.
Installing Git in system context is the recommended approach for enterprise deployments, as it ensures the application is available for all users on the device and persists through user profile resets.
This means the automatic integration simply does not work when deploying through modern management tools like Microsoft Intune, Microsoft Configuration Manager, or similar enterprise deployment solutions.
Customization control: Manually adding Git Bash to Windows Terminal allows for greater customization and ensures the configuration fits individual user preferences. Each user can:
- Choose their preferred starting directory
- Set custom color schemes and fonts
- Configure key bindings specific to their workflow
- Adjust the profile icon and appearance
- Set environment variables as needed
This level of personalization is not possible with the automatic installation, which uses generic default settings.
Deployment consistency: Keeping the Git Bash Windows Terminal setup separate from the initial installation helps maintain a consistent deployment process. The Git installation remains clean and predictable, while users can configure their terminal experience according to their needs. This separation of concerns reduces the likelihood of deployment errors and simplifies troubleshooting.
To install Git silently (without user interaction), you can use the following command:
"Git-<version>-<bitness>.exe" /ALLUSERS /VERYSILENT /CLOSEAPPLICATIONS /NORESTART /COMPONENTS=""Tip
For a complete list of available installation options, run the installer with/? or review the Git for Windows installer documentation .Adding Git Bash to Windows Terminal
Now that we understand the benefits of manual configuration, let us walk through the process of adding Git Bash to Windows Terminal.
Open Windows Terminal settings: Start Windows Terminal by clicking on its icon or by searching for it in the Start Menu. Once open, access the settings by clicking on the dropdown arrow next to the tabs and selecting Settings, or use the keyboard shortcut
Ctrl + ,.Add a new profile: In the Settings interface, navigate to Profiles in the left sidebar, then click Add a new profile. Select New empty profile to create a custom configuration for Git Bash.
Configure the profile: Configure the following settings for your Git Bash profile:
Setting Value Name Git Bash Command line %ProgramFiles%\Git\bin\bash.exeStarting directory %USERPROFILE%Icon %ProgramFiles%\Git\mingw64\share\git\git-for-windows.ico
- Save and verify: Click Save to apply your changes. Windows Terminal will automatically refresh and add the new profile. Click on the dropdown arrow next to the tabs, and you should now see Git Bash as one of the options. Click on it to open a Git Bash session within Windows Terminal.
Note
If Git is installed in a different location, adjust the paths accordingly. For user-context installations, the path might be%LOCALAPPDATA%\Programs\Git\bin\bash.exe.Alternative: Edit settings.json directly
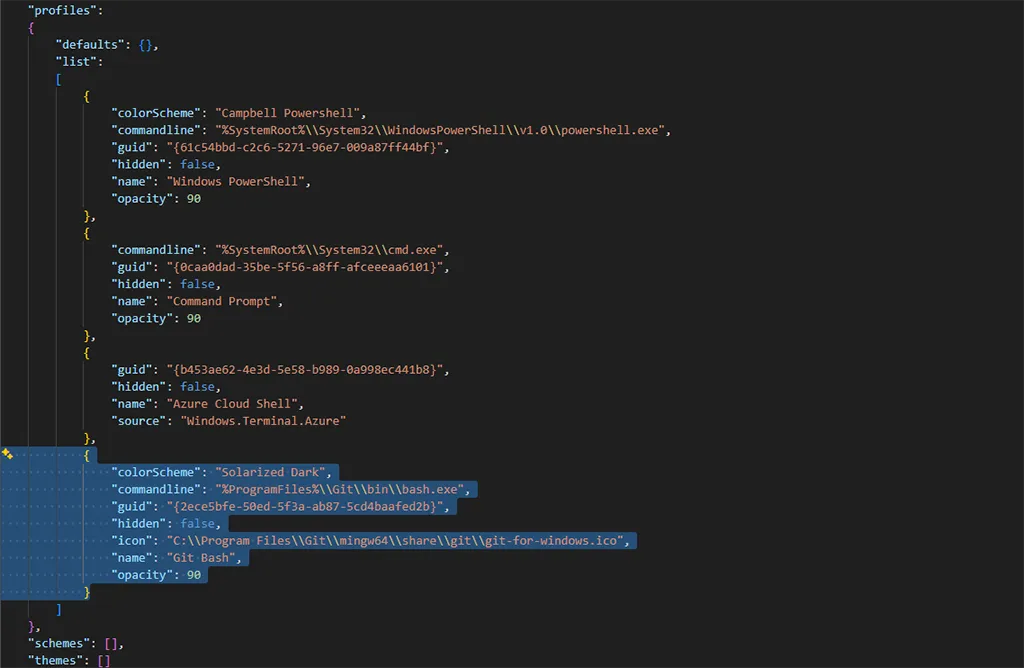
For those who prefer editing configuration files directly, you can add the Git Bash profile to your settings.json file. Open Windows Terminal settings and click Open JSON file in the bottom left corner.
Image viewer

Add the following JSON snippet to the profiles.list array:
{
  "commandline": "%ProgramFiles%\\Git\\bin\\bash.exe",
  "guid": "{2ece5bfe-50ed-5f3a-ab87-5cd4baafed2b}",
  "hidden": false,
  "icon": "C:\\Program Files\\Git\\mingw64\\share\\git\\git-for-windows.ico",
  "name": "Git Bash",
}
Git Bash profile configuration
Tip
ARM64 users: If you are using Git for Windows on an ARM64 device (such as Surface Pro X, Windows Dev Kit 2023, or other Snapdragon-powered PCs), replacemingw64 with clangarm64 in the icon path. The correct path would be %ProgramFiles%\Git\clangarm64\share\git\git-for-windows.ico.Image viewer
Tip
You can generate a unique GUID for your profile using PowerShell:[guid]::NewGuid().ToString()Customizing your Git Bash profile
Once you have Git Bash added to Windows Terminal, you can further customize the experience to match your preferences.
Color schemes: Windows Terminal supports custom color schemes. You can apply an existing scheme or create your own. For Git Bash, I recommend trying schemes like One Half Dark, Tango Dark, or Solarized Dark that complement the Unix-style interface.
Font configuration: Consider using a programming font that supports ligatures and powerline symbols, such as:
- Cascadia Code
- Fira Code
- JetBrains Mono
Additional profile settings: You can enhance your Git Bash profile with additional settings in the JSON configuration:
{
  "colorScheme": "Solarized Dark",
  "commandline": "%ProgramFiles%\\Git\\bin\\bash.exe",
  "cursorShape": "bar",
  "fontFace": "Cascadia Code",
  "fontSize": 11,
  "guid": "{2ece5bfe-50ed-5f3a-ab87-5cd4baafed2b}",
  "hidden": false,
  "icon": "%ProgramFiles%\\Git\\mingw64\\share\\git\\git-for-windows.ico",
  "name": "Git Bash",
  "opacity": 90,
  "startingDirectory": "%USERPROFILE%",
  "useAcrylic": true
}
Enhanced Git Bash profile configuration
Adding Git Bash to Visual Studio Code Terminal
While Windows Terminal is excellent for standalone terminal work, you might also want Git Bash available directly within Visual Studio Code. The good news is that Visual Studio Code makes this straightforward to configure.
Configuring Git Bash in Visual Studio Code
Click to expandVisual Studio Code uses terminal profiles to manage available shells. To add Git Bash:
- Open Visual Studio Code and access settings using
Ctrl + , - Search for
terminal.integrated.profiles.windows - Click Edit in settings.json to open the configuration file
Add the following configuration to your settings.json:
{
  "terminal.integrated.profiles.windows": {
      "Git Bash": {
        "path": "C:\\Program Files\\Git\\bin\\bash.exe",
        "icon": "terminal-bash"
      }
  }
}
Git Bash terminal profile for Visual Studio Code
Setting Git Bash as the default terminal: If you want Git Bash to be your default terminal in Visual Studio Code, add this additional setting:
{
  "terminal.integrated.defaultProfile.windows": "Git Bash"
}
Set Git Bash as default terminal
Using Git Bash in Visual Studio Code: Once configured, you can access Git Bash in several ways:
- New terminal: Press
Ctrl + `to open a new terminal, then click the dropdown arrow next to the + button and select Git Bash - Terminal dropdown: Use the terminal panel dropdown to switch between available shells
- Command Palette: Press
Ctrl + Shift + P, typeTerminal: Select Default Profile, and choose Git Bash
This complements the built-in Git integration in Visual Studio Code, giving you both the convenience of the GUI and the power of the command line when you need it.
Tip
Visual Studio Code automatically detects Git Bash if Git for Windows is installed in the default location. Check your terminal dropdown - Git Bash might already be available without any configuration.Final Thoughts
Adding Git Bash to Windows Terminal manually provides the flexibility and customization that enterprise environments and power users need. While the automatic installation option might seem convenient, it falls short in system context deployments and limits personalization options.
By following the steps in this guide, you now have a fully configured Git Bash profile in Windows Terminal, ready to enhance your development and scripting workflow. The combination of Git’s powerful version control capabilities with Windows Terminal’s modern interface creates a productive environment for any IT professional or developer.
Whether you are managing code repositories, writing PowerShell scripts, or automating tasks with Microsoft Intune and Microsoft Graph, having Git Bash readily available in your terminal is a game-changer.
–Jesper
Header image attribution: Image created with help from Microsoft Copilot